

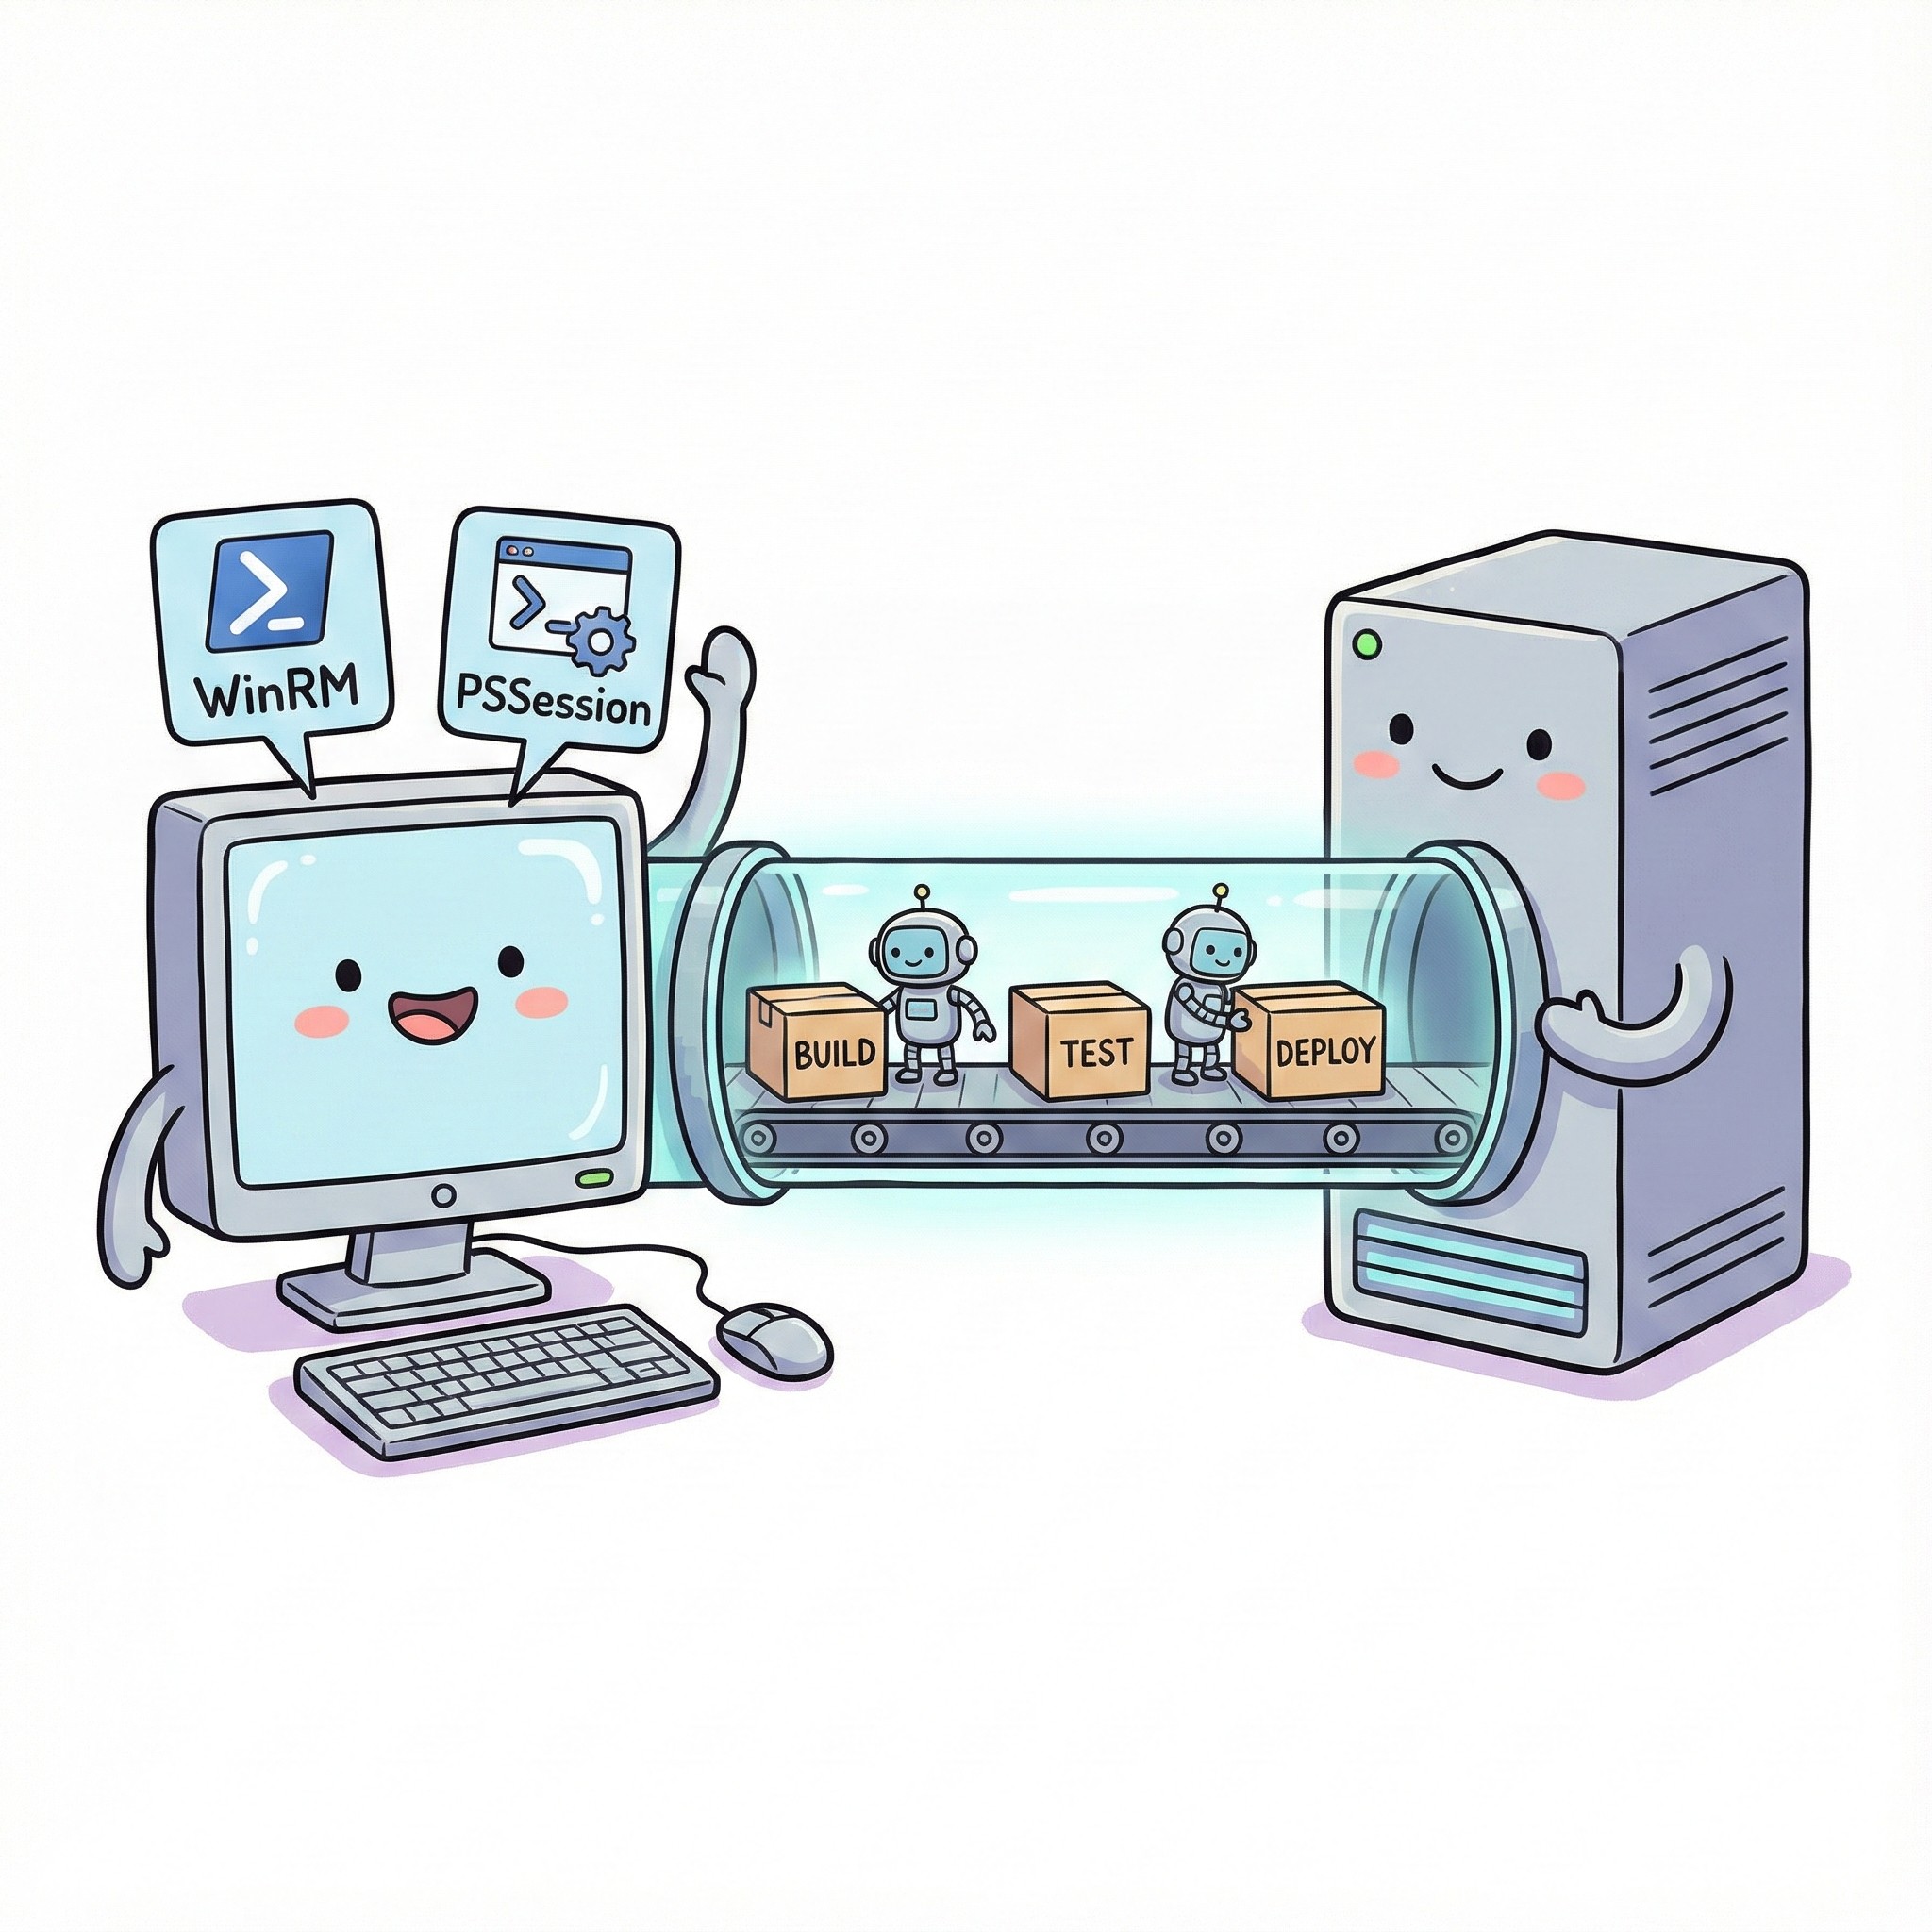
在 Windows 世界裡,只要談到「遠端執行 PowerShell 指令」或是「從 CI/CD Pipeline 自動把程式丟到伺服器」,幾乎都會遇到兩個名詞:WinRM 跟 PSSession。這兩個其實不是競爭關係,而是分層合作:WinRM 負責提供底層遠端通訊通道,PSSession 則是在這個通道上建立起來的 PowerShell 遠端工作階段。本篇先說明兩者的概念與關係,再示範如何在 Azure Pipelines 的 CD 階段,透過 WinRM/PSSession 把 .NET 10 應用程式的建置成品複製到目標主機進行部署。
什麼是 WinRM?
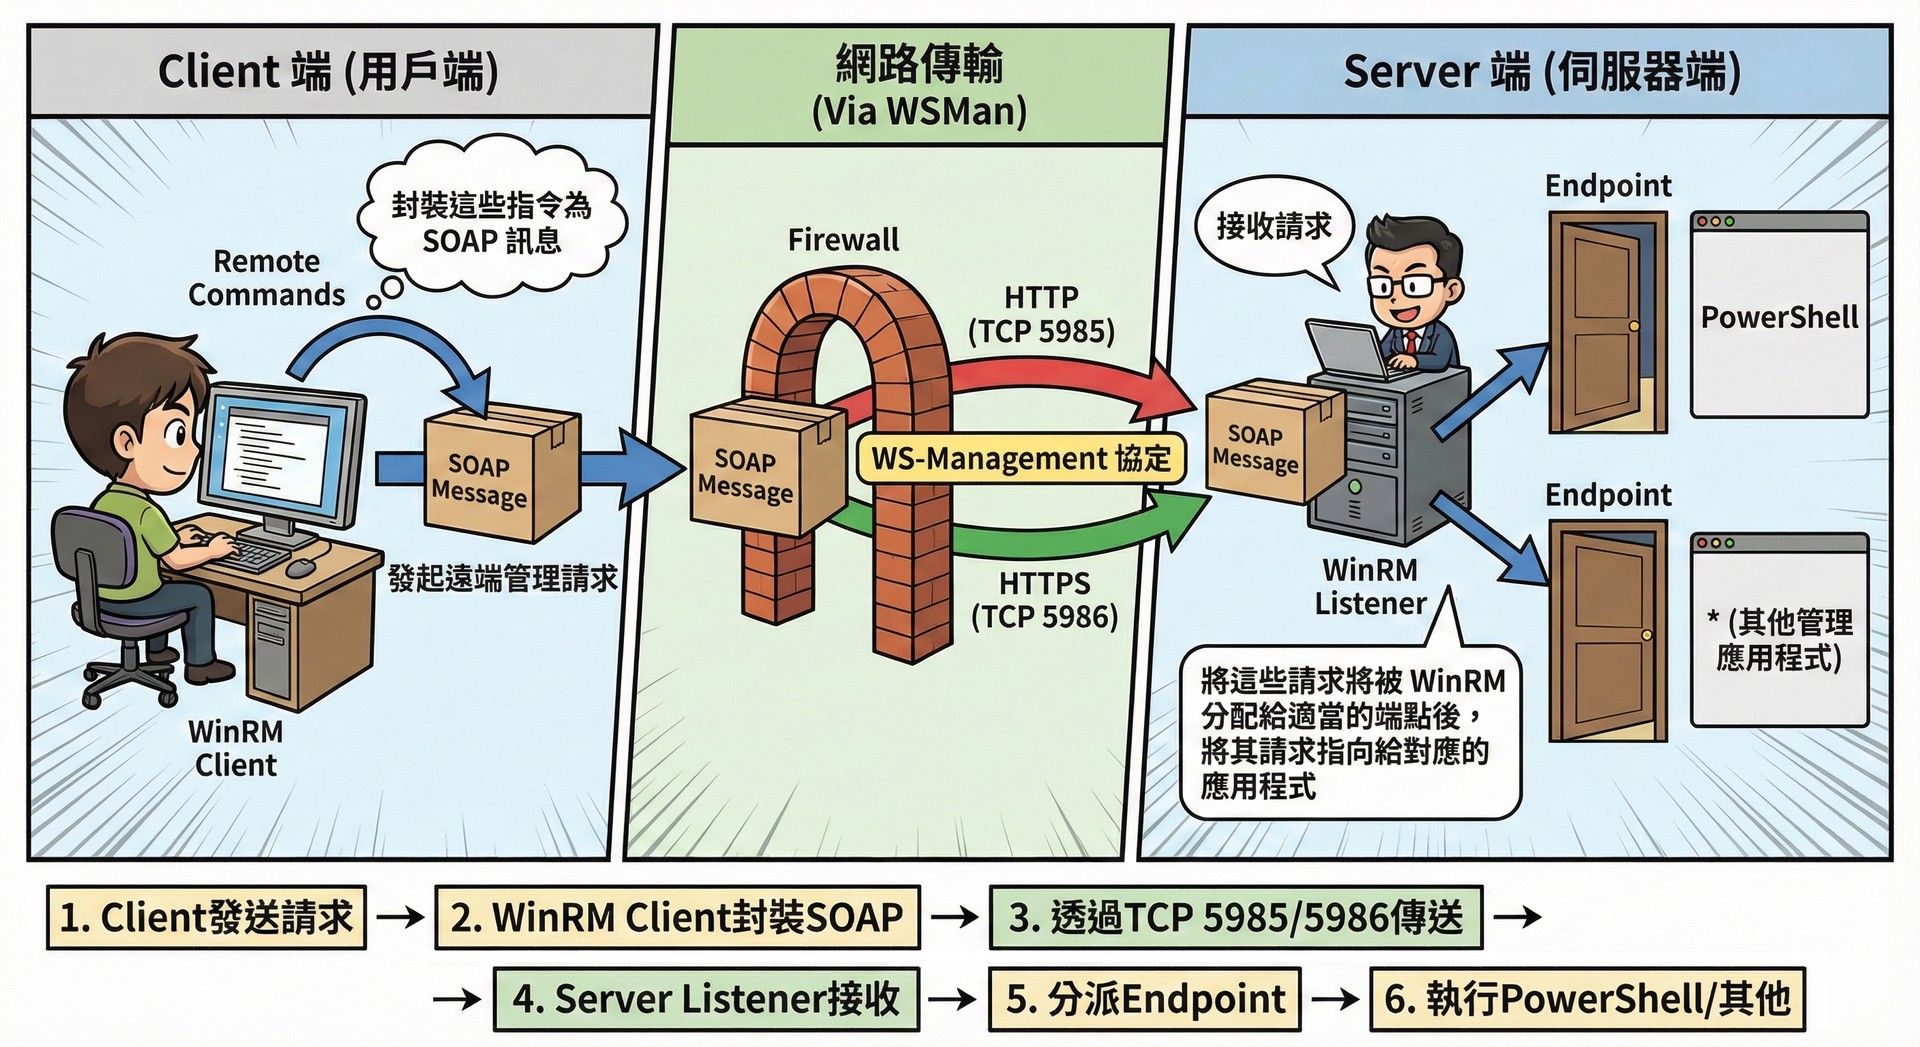
WinRM (Windows Remote Management) 是微軟實作的遠端管理服務,它是基於 WS-Management 協定(走 HTTP/HTTPS + SOAP)的一層管理通道。啟用 WinRM 之後,目標主機會在預設的連接埠上等待遠端要求:
- HTTP:TCP 5985
- HTTPS:TCP 5986
WinRM 的角色可以想像成「遠端管理郵局」:
- Client 把要執行的遠端指令封裝成 SOAP 訊息,送到 WinRM Listener。
- WinRM 收到訊息後,根據 Endpoint 設定,啟動對應的提供者 (Provider)。
- 對 PowerShell 而言,WinRM 會啟動像
wsmprovhost.exe這類的處理程序,負責實際執行 PowerShell 指令。
也因為 WinRM 是通用的管理通道,所以除了 PowerShell 之外,其他管理應用程式也可以透過 WinRM 來接收與處理遠端要求。
什麼是 PSSession?
PSSession 則是 PowerShell 提供的「遠端工作階段物件」,你可以把它想成是在遠端主機上開了一個持續存在的 PowerShell 視窗,只是畫面沒有顯示在你前面而已。
幾個常見的 cmdlet:
New-PSSession:建立遠端工作階段物件。Enter-PSSession:進入互動式遠端 Shell。Invoke-Command -Session:在既有的 PSSession 裡執行指令或 ScriptBlock。Remove-PSSession:關閉遠端工作階段,釋放資源。
使用 PSSession 的好處:
- 同一個 Session 中可以連續執行多個指令,重複利用連線與驗證結果。
- 可以在 Session 內保留變數、已載入的模組、目前路徑等狀態。
- 在大量部署或需要多次互動的情境下,效率會比一次性的
Invoke-Command -ComputerName好很多。
WinRM 與 PSSession 之間的關係
在典型的 Windows 環境中,PowerShell Remoting 預設是透過 WinRM 當作傳輸層 來建立 PSSession,也就是說:
- WinRM:負責「如何把封包從 Client 送到 Server」。
- PSSession:負責「在 Server 上開一個 PowerShell 遠端工作階段」。
所以大家可以這麼理解:
WinRM 提供管道,PSSession 就是在這條管道上跑 PowerShell 的列車。
如果 WinRM 沒有啟用或設定有問題(例如:防火牆沒開、Listener 沒建立、憑證或 TrustedHosts 沒設好),那 New-PSSession 或 Enter-PSSession 這類指令就會直接報錯,常見錯誤訊息像是:「WinRM 用戶端無法處理該要求」。
從協定層次來看,WinRM 是一個通用的遠端管理協定,而 PowerShell Remoting(包含 PSSession)只是跑在其上的其中一種應用層實作。在較新的 PowerShell 版本中,也可以改用 SSH 當作傳輸層,不過在多數 Windows AD 企業環境裡,WinRM 仍然是最常見、整合度也最高的選項。
WinRM / PSSession 架構概念
從 Client 發出一個遠端 PowerShell 指令,到 Server 端執行完成,中間大致會經過這幾個步驟:
- 使用者在 Client 上執行
New-PSSession或Enter-PSSession。 - PowerShell 呼叫 WinRM Client,將 ScriptBlock / 指令內容包成 SOAP 訊息。
- SOAP 訊息透過 TCP 5985/5986 穿過防火牆,送到遠端主機上的 WinRM Listener。
- WinRM Listener 驗證身分、檢查授權後,將要求派送給對應的 Endpoint(例如 PowerShell)。
- PowerShell Provider 啟動處理程序(例如
wsmprovhost.exe),在遠端建立 / 維護 PSSession。 - 遠端 PowerShell 執行完指令後,把結果再透過同一條通道包成 SOAP 回傳給 Client。
就像文章最上面的 WinRM 示意圖,可以把中間那個「Firewll + WS-Management 協定」想成一座橋,橋兩端分別是執行 PowerShell 的 Client 和 Server,WinRM 就是在橋上來回搬運 SOAP 訊息的工人,而 PSSession 則是工人幫你在對岸搭好的工作站。
實作:在兩台電腦之間建立 PSSession
以下假設情境:
- Client:本地開發環境 / Build Agent,一般使用者帳號
DOMAIN\deployuser。 - Server:IIS Web Server,主機名稱
WEB01。 - 兩台機器在同一個 AD 網域,網路上互通,防火牆允許 5985(或 5986)。
1. 在 Server 上啟用與設定 WinRM
在 Server(WEB01)以系統管理員身分開啟 PowerShell,先確認 WinRM 服務與 PowerShell Remoting:
1 | # 啟用 WinRM 基本設定(服務、Listener、防火牆) |
如果是第一次執行 winrm quickconfig,系統會詢問是否:
- 啟用 WinRM 服務並設為自動啟動。
- 建立預設 Listener。
- 開啟對應的防火牆規則。
依照提示輸入 Y 即可完成基本設定。接著可以用下列指令確認目前的 Listener 狀態:
1 | winrm e winrm/config/listener |
在一般 AD 網域環境,使用 HTTP + Kerberos 驗證就足夠;如果需要跨網段、跨網域或是走 HTTPS,可以再另外建立 HTTPS Listener 並匯入憑證。
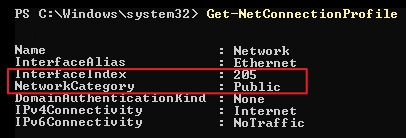
常見錯誤:Public 網路導致 Enable-PSRemoting 失敗

有時候在執行 Enable-PSRemoting -Force 會看到類似下列錯誤訊息:
WinRM 防火牆例外無法啟用,因為此機器上的某個網路連線其網路類型是 Public,請先改成 Domain 或 Private 再重試。
這是因為 Enable-PSRemoting 內部會呼叫 Set-WSManQuickConfig,預設只會在 Domain / Private 網路 上自動開啟 WinRM 的防火牆規則;只要偵測到有任何一張網卡被標成 Public,就會視為不安全環境而中止。常見情境包括:
- 除了實體網卡之外,還有 Wi‑Fi、VPN、虛擬機器 vSwitch 等虛擬介面。
- 其中至少一個連線的 NetworkCategory 是 Public。
這時可以依照情況選擇下面兩種處理方式:
方式一:把 Public 改成 Private / Domain(建議)
-
先列出目前所有連線的網路類型:
1
Get-NetConnectionProfile
找出
NetworkCategory為Public的介面(通常會看到 InterfaceIndex)。
-
將需要啟用 WinRM 的那個連線改成 Private:
1
Set-NetConnectionProfile -InterfaceIndex <InterfaceIndex的值> -NetworkCategory Private
或者在「設定 → 網路和網際網路 → 以太網路 / Wi‑Fi → 該連線 → 網路設定檔」中,手動改為「私人」。

-
調整完成後再重新執行:
1
Enable-PSRemoting -Force
方式二:略過網路類型檢查(風險較高)
若確認目前環境是受控網路,暫時無法改變連線類型,也可以選擇直接略過這個檢查:
1 | Enable-PSRemoting -SkipNetworkProfileCheck -Force |
這樣會在目前的網路設定下直接啟用 WinRM,之後建議再搭配防火牆規則,限制允許存取 WinRM 的來源 IP 或子網,以降低暴露風險。特別是在 Notebook / 多網卡環境,更要注意不要對公共網路無限制開放。
2. 在 Client 端啟用與設定 WinRM
多數新版 Windows 在當作「Client 端」時,其實不需要太多額外設定,只要能透過網路連到 Server 的 5985/5986 連接埠即可。不過在某些情境下(例如:Workgroup、跨信任網域),你會需要多做幾件事:
-
確認 WinRM 服務狀態:
1
Get-Service winrm
若狀態不是 Running,可以用:
1
2Set-Service winrm -StartupType Automatic
Start-Service winrm -
如果 Client 與 Server 不在同一個 AD 網域,或是 Workgroup 環境,就要在 Client 上把 Server 加到 TrustedHosts,允許連線:
1
2
3
4
5
# 將單一主機加入 TrustedHosts
Set-Item WSMan:\localhost\Client\TrustedHosts -Value 'WEB01' -Force
# 如果有多台,可以用逗號分隔
Set-Item WSMan:\localhost\Client\TrustedHosts -Value 'WEB01,WEB02' -Force也可以用
*允許所有主機,但風險較高,通常建議只在測試環境使用。 -
最後用下列指令檢查目前的 Client 端設定:
1
winrm get winrm/config/client
確認
TrustedHosts是否包含目標主機名稱,以及是否有符合安全政策的驗證方式(例如:只啟用 Kerberos,不開 Basic + AllowUnencrypted)。
3. 測試從 Client 建立 PSSession
在 Client 端 PowerShell,先用目前登入帳號嘗試連線:
1 | $session = New-PSSession -ComputerName WEB01 |
如果一切順利,畫面上會印出來自 WEB01 的訊息,代表 WinRM 與 PSSession 都已經可以正常使用。
若需要指定其他認證,可以這樣寫:
1 | $cred = Get-Credential -UserName 'DOMAIN\\deployuser' -Message '輸入部署帳號密碼' |
在非網域環境、或需跨信任邊界連線時,還會用到 TrustedHosts、HTTPS Listener 等額外設定,這部分可以再參考 WinRM 相關文章的進階設定說明。
Azure Pipelines CD 範例:用 PSSession 複製 drop.zip 到 IIS Web Server
前面都在講觀念,接下來用一個實際情境來說明:
使用 Azure Pipelines 將 .NET 10 應用程式建置完成的
drop.zip部署到WEB01伺服器的C:\inetpub\wwwroot目錄。
前置條件
- 已經有一條 Build Pipeline,產出
drop.zip並發佈成 Artifacts。 - CD 使用的是 Self-hosted agent,且這台 Agent 機器可以透過 WinRM 連到
WEB01。 - WEB01 已依前面步驟啟用並設定好 WinRM。
1. 在 Release/CD 階段下載 Artifacts
在 YAML Pipeline 的部署 Stage 中,先把 Build Artifacts 下載回 Agent:
1 | steps: |
假設 drop.zip 會出現在 $(Pipeline.Workspace)/drop/drop.zip。
2. 使用 PowerShell Task 建立 PSSession 並複製檔案
接著新增一個 PowerShell@2 工作,在裡面用 WinRM / PSSession 把 drop.zip 複製到 WEB01:
1 | - task: PowerShell@2 |
上面示範的流程概要是:
- 在 Agent 上下載
drop.zip。 - 透過
New-PSSession連線到 WEB01。 - 使用
Copy-Item -ToSession把drop.zip複製到C:\inetpub\wwwroot。 - 在遠端透過
Invoke-Command -Session解壓縮 zip、備份舊版網站、覆蓋成新版內容。 - 最後關閉 PSSession,釋放資源。
實務上建議再搭配:
- 把部署帳號與密碼改存放在 Secret Variable / Variable Group / Key Vault,避免出現在 YAML 明文。
- 加上更多錯誤處理與 Log,方便日後在 Pipeline 失敗時快速排查。
- 若需要同時部署到多台 Web Server,可以使用多個 PSSession,搭配
Invoke-Command -Session的陣列呼叫方式一次下達指令。
小結
如果把部署流程拆解,會發現 WinRM 和 PSSession 負責的其實就是最關鍵的那一段:
- WinRM:讓 Build/Release Agent 可以安全、可控地連到目標主機。
- PSSession:讓我們在遠端主機上,像本機一樣連續執行多個 PowerShell 指令,完成檔案傳輸、解壓縮、備份與切換等工作。
了解這兩層的角色之後,不只在 Azure Pipelines,未來不管是其他 CI/CD 工具,或單純寫一隻自動化部署 Script,都可以用同樣的概念把 WinRM + PSSession 當成程式部署的最佳幫手。